DNS server installation - knot-resolver
Install a DNS server on the server machine - here we show how to setup KNOT on Ubuntu 22.04
Every device on the network needs to know how to reach the Aivero system.
If your IT department handles this network, please have them resolve aivero.lan and any sub- and sub-sub domain (eg. api.openbalena.aivero.lan) to the server IP.
In this guide, we will use the https://knot-resolver.readthedocs.io/en/stable/#
Overview
We will
- Install knot
- Configure Ubuntu's
systemd-resolvto use knot as the DNS server - Configure knot to listen also to requests coming from the network and to resolve the
aivero.landomains to the server - Restart both
systemd-resolvandknot - Test DNS resolution
Installation
We follow: https://knot-resolver.readthedocs.io/en/stable/quickstart-install.html
wget https://secure.nic.cz/files/knot-resolver/knot-resolver-release.deb
sudo dpkg -i knot-resolver-release.deb
sudo apt update
sudo apt install -y knot-resolver

sudo systemctl start kresd@1.service
sudo systemctl enable kresd@1.service
Configure systemd-resolv to use knot
Create a systemd-resolv configuration stub file to configure systemd-resolv to use knot and
sudo mkdir -p /etc/systemd/resolved.conf.d
sudo nano /etc/systemd/resolved.conf.d/00-use-knot.conf
# press `ctrl+x` and then `y+enter` to save
And add the following config:
[Resolve]
DNS=127.0.0.1
DNSStubListener=no
Configure knot to listen on port 53
Open the knot config file and adjust the IPs to listen on from 127.0.0.1 to 0.0.0.0.
Knot will then respond to requests coming in on any network the server is attached to.
sudo nano /etc/knot-resolver/kresd.conf
# press `ctrl+x` and then `y+enter` to save
This will look like this:
-- SPDX-License-Identifier: CC0-1.0
-- vim:syntax=lua:set ts=4 sw=4:
-- Refer to manual: https://knot-resolver.readthedocs.org/en/stable/

-- Network interface configuration
net.listen('127.0.0.1', 53, { kind = 'dns' })
net.listen('127.0.0.1', 853, { kind = 'tls' })
--net.listen('127.0.0.1', 443, { kind = 'doh2' })
net.listen('::1', 53, { kind = 'dns', freebind = true })
net.listen('::1', 853, { kind = 'tls', freebind = true })
--net.listen('::1', 443, { kind = 'doh2' })

-- Load useful modules
modules = {
        'hints > iterate',  -- Allow loading /etc/hosts or custom root hints
        'stats',            -- Track internal statistics
        'predict',          -- Prefetch expiring/frequent records
}

-- Cache size
cache.size = 100 * MB
Here modify the IPs from 127.0.0.1 to 0.0.0.0 so that it looks as such
-- SPDX-License-Identifier: CC0-1.0
-- vim:syntax=lua:set ts=4 sw=4:
-- Refer to manual: https://knot-resolver.readthedocs.org/en/stable/

-- Network interface configuration
net.listen('0.0.0.0', 53, { kind = 'dns' })
net.listen('0.0.0.0', 853, { kind = 'tls' })
--net.listen('0.0.0.0', 443, { kind = 'doh2' })
net.listen('::1', 53, { kind = 'dns', freebind = true })
net.listen('::1', 853, { kind = 'tls', freebind = true })
--net.listen('::1', 443, { kind = 'doh2' })

-- Load useful modules
modules = {
        'hints > iterate',  -- Allow loading /etc/hosts or custom root hints
        'stats',            -- Track internal statistics
        'predict',          -- Prefetch expiring/frequent records
}

-- Cache size
cache.size = 100 * MB
Configure knot to resolve aivero.lan domains
aivero.lan domainsNow add the configuration snippet allowing knot to resolve aivero.lan to this server.
For this, you need to know the IP address that we configured for the server Please replace the PUT_IP_ADDRESS_HERE_IN_THESE_SINGLE_TICKS in the script below.
Simply add this snippet to the bottom of the file
sudo nano /etc/knot-resolver/kresd.conf
# press `ctrl+x` and then `y+enter` to save
local genRR = policy.ANSWER({
[kres.type.A] = { rdata=kres.str2ip('PUT_IP_ADDRESS_HERE_IN_THESE_SINGLE_TICKS'), ttl=900 },
}, true)
policy.add(policy.suffix(genRR, { todname('aivero.lan.') }))
policy.add(policy.suffix(genRR, { todname('openbalena.aivero.lan.') }))The complete file should look like this now:
-- SPDX-License-Identifier: CC0-1.0
-- vim:syntax=lua:set ts=4 sw=4:
-- Refer to manual: https://knot-resolver.readthedocs.org/en/stable/

-- Network interface configuration
net.listen('0.0.0.0', 53, { kind = 'dns' })
net.listen('0.0.0.0', 853, { kind = 'tls' })
--net.listen('0.0.0.0', 443, { kind = 'doh2' })
net.listen('::1', 53, { kind = 'dns', freebind = true })
net.listen('::1', 853, { kind = 'tls', freebind = true })
--net.listen('::1', 443, { kind = 'doh2' })

-- Load useful modules
modules = {
        'hints > iterate',  -- Allow loading /etc/hosts or custom root hints
        'stats',            -- Track internal statistics
        'predict',          -- Prefetch expiring/frequent records
}

-- Cache size
cache.size = 100 * MB

local genRR = policy.ANSWER({
[kres.type.A] = { rdata=kres.str2ip('192.168.88.248'), ttl=900 },
}, true)

policy.add(policy.suffix(genRR, { todname('aivero.lan.') }))
policy.add(policy.suffix(genRR, { todname('openbalena.aivero.lan.') }))
Restart systemd-resolv and knot
systemd-resolv and knotsudo systemctl restart systemd-resolved
sudo systemctl restart kresd@1.service
# Check both services are running correctly by checking for the text `active (running)` in
sudo systemctl status systemd-resolved
sudo systemctl status kresd@1.service
Test DNS resolution works
You should now be able to resolve any subdomain of aivero.lan
ping api.openbalena.aivero.lan
ping aivero.lan


# Alternatively, if you have dig installed, there will be more logs
dig api.openbalena.aivero.lan
dig aivero.lan
Allow DNS requests in the Ubuntu Firewall (if enabled)
In case you did previously enable the ubuntu firewall (this is not part of this guide) you need to allow traffic to the DNS port to pass through. You can configure the ufw firewall as such:
sudo ufw allow 53/tcp
sudo ufw allow 53/udp
Configure your router / DHCP server to advertise this DNS server
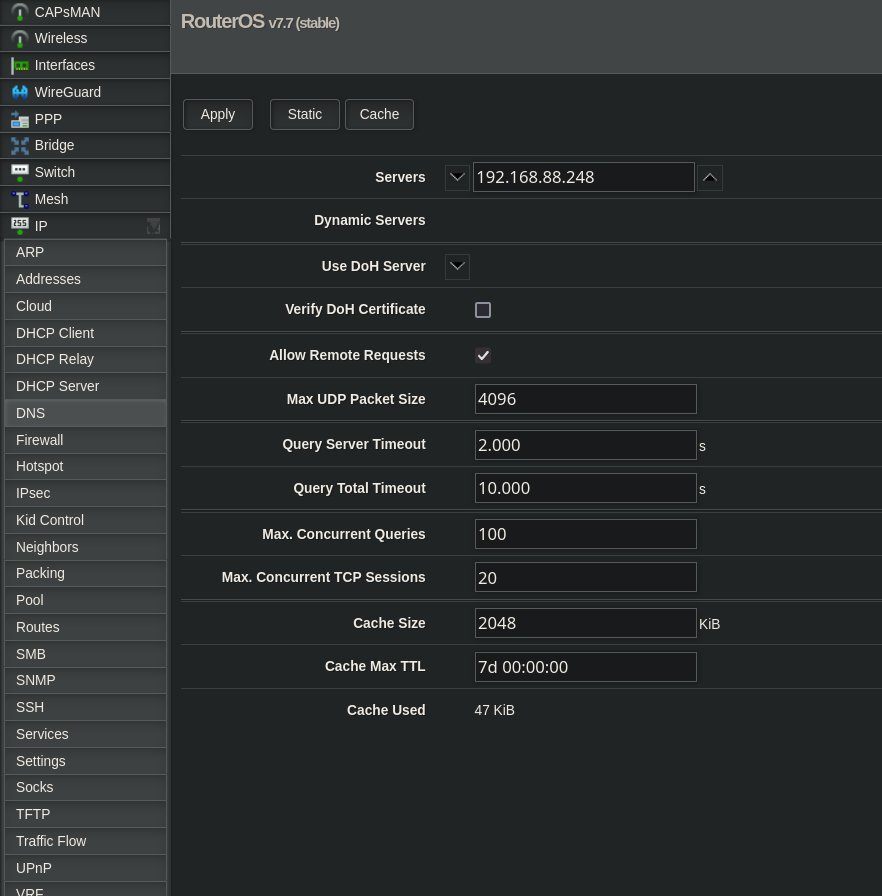
Mikrotik
Navigate to the Mikrotik configuration frontend (e.g. 192.168.88.1).
Now find IP on the left-hand bar and there select DNS.
Place your server's IP address (e.g. 192.168.88.248) in the Servers section and press Apply
Updated 3 months ago